
Social Media Approval Workflow: How Agencies Can Get Client Approvals Faster
 jyoti//7 min read
A social media approval workflow is a structured process that helps agencies create, review, revise, and get client approval for social media content before it is published. It organizes each stage of content approval so agencies can manage feedback efficiently and reduce delays.
Why is your social media approval workflow taking longer than creating the content itself?
Your post is ready, but the client hasn’t replied. You send a WhatsApp message, follow up again, and finally get: “Can we change the image?”
Now the designer has to revise it, another version goes out, and your publishing schedule gets pushed.
A clear approval process keeps drafts, feedback, revisions, and final approvals in one place instead of scattered across WhatsApp, email, and spreadsheets.
In this guide, you’ll learn how to create a smoother approval process, reduce follow-ups, and get clients to approve social media content faster.
What Is a Social Media Approval Workflow?
A social media approval workflow is the process a piece of content follows before it gets published.
A simple agency workflow usually looks like this:
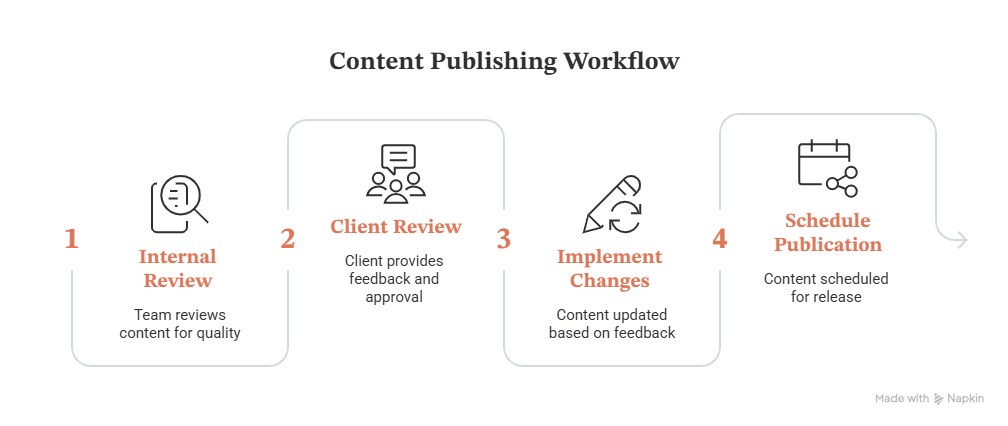
The exact stages can change depending on the agency and client. A small team may only need internal review and client approval, while regulated industries may need additional legal or compliance checks.
The important part is that everyone knows:
- Who is responsible for each stage
- Where feedback should be given
- Who gives the final approval
- When approval is due
- What happens when changes are requested
Without those rules, even a good content team can end up spending more time chasing approvals than creating content.
How to Create a Social Media Approval Workflow
A simple social media approval workflow can follow six steps: plan the content, create the content, review it internally, send it to the client, handle changes or approval, and schedule the approved content.
1. Plan the Content
Start with the content calendar.
Decide what needs to be published, for which platform, for which client, and on what date. A clear calendar gives the team enough time to create and review content before the publishing deadline.
If you need a starting point, our Free Social Media Content Calendar Template can help organize your content before it enters the approval process.
2. Create the Content
The creator prepares everything the reviewer or client needs to see:
- Creative
- Caption
- Platform
- Link or CTA
- Hashtags, if required
- Planned publishing date
The more complete the first submission is, the fewer unnecessary revision rounds you’ll have later.
3. Internal Review
Don’t send unfinished work directly to the client.
An internal reviewer should check the content for spelling, brand voice, visual quality, links, formatting, and basic accuracy.
This protects both the agency and the client from avoidable mistakes.
4. Client Review
Once the content passes internal review, send it to the client.
The client should be able to see the actual content clearly and understand exactly what they are approving.
This is where client approval workflow becomes especially important. If clients have to search through emails or chat messages to find the latest version, approval will naturally take longer.
5. Changes or Approval
The client has two simple choices:
Approve
or
Request Changes
If changes are requested, the post should move back to the revision stage rather than creating another disconnected conversation.
Every comment should remain attached to the content it refers to.
6. Schedule and Publish
Once approval is complete, the post moves to scheduling or publishing.
The important rule is simple:
Approved content gets published. Unapproved content doesn’t.
That single rule prevents a surprising number of avoidable mistakes.
How to Get Clients to Approve Social Media Content Faster

To get clients to approve social media content faster, agencies should make the approval process simple, set clear deadlines, organize feedback in one place, and send timely reminders. A structured approval workflow reduces unnecessary follow-ups and helps clients quickly review, comment on, and approve content.
Here are some practical changes agencies can make.
Give Clients One Place to Review
Don’t send the creative through WhatsApp, the caption through email, and the calendar through a spreadsheet.
Put the content, caption, and approval action together wherever possible.
Set a Clear Deadline
Instead of saying:
“Please review this.”
Say:
“Please review this by Thursday at 3 PM so we can publish it Friday.”
A specific deadline gives the client something concrete to work with.
Keep Feedback With the Post
If a client says “change the headline” in a WhatsApp message, someone has to remember which post they mean.
Feedback should stay attached to the relevant content so the team can see the complete context.
Reduce Login Friction
This one is easy to overlook.
If a client needs to create an account, remember another password, or navigate through a complicated dashboard just to approve one post, you’ve added another reason for them to postpone it.
A social media approval tool with a simple review experience can remove that friction.
What Should a Social Media Approval Tool Include?
A useful tool should offer:
- A visual content calendar
- Centralized client feedback
- Clear approval statuses
- Client-specific permissions
- Approval notifications
- Version clarity
- Easy client access
- A record of approvals
For a deeper look at approval workflows, roles, permissions, and review stages, Hootsuite’s guide to social media approval workflows is a useful reference. Hootsuite’s social media approval workflow guide
Why No-Login Approval Can Make a Difference
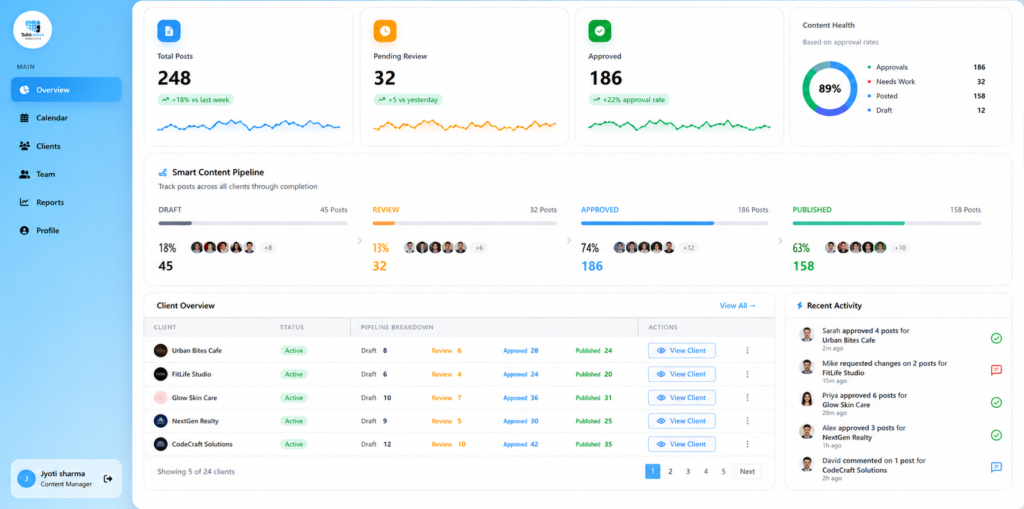
No-login approval can make the client review process easier because clients can access content without creating or remembering another account. A simple review link lets them view posts, leave feedback, and approve content with fewer steps, reducing friction and making it easier to complete approvals on time.
Imagine sending a client a post for approval.
Option one: they open the message, click a platform link, remember their password, find the correct client workspace, locate the post, and approve it.
Option two: they open a private link, see the content, leave a comment if needed, and approve it.
The second experience has fewer steps.
That’s the idea behind no-login client approval.
QuickSocials uses secure approval links so clients can review content without creating an account or remembering another password.
It also combines a visual content calendar, client-specific access, and real-time approval notifications in the same workflow.
If you’re comparing dedicated tools, you can also read our SocialPilot vs QuickSocials comparison to see how the two approaches differ.
How QuickSocials Fits Into the Workflow
QuickSocials fits into the social media approval workflow by giving agencies one place to create content, organize posts, share client review links, collect feedback, and track approvals. Clients can review and approve content without logging in, while agencies can keep the approval process organized instead of relying on scattered messages or emails.
QuickSocials is designed around the part of agency work that often gets messy: client review and approval.
Instead of moving between a spreadsheet for planning, WhatsApp for feedback, email for follow-ups, and another tool for notifications, agencies can manage the approval process in one place.
The workflow becomes much simpler:
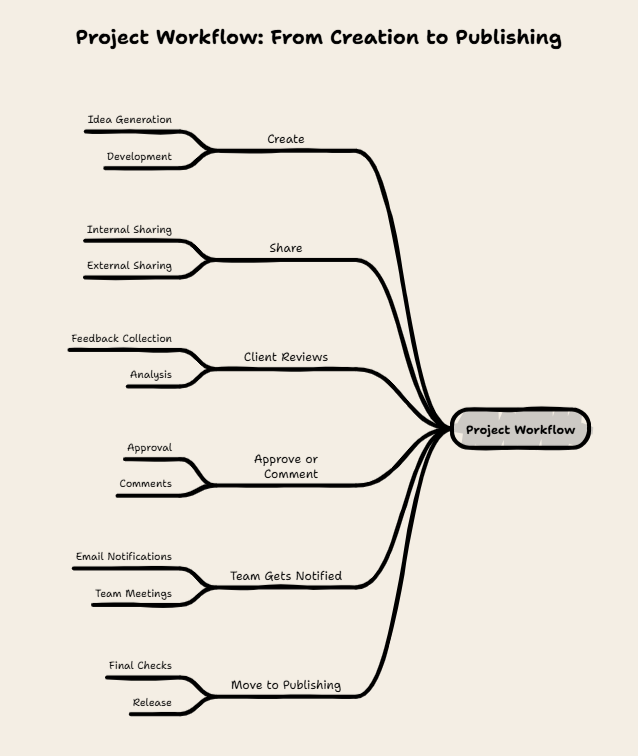
Clients don’t need to create an account just to approve content.
For agencies working with several clients, that means less manual follow-up and a clearer view of what is waiting for approval.
Still Chasing Clients for “Approved”?
Your agency can create great content and still lose hours waiting for clients to approve it. The problem isn’t always the client.
Often, it’s a slow approval process spread across WhatsApp, email, spreadsheets, and endless follow-ups.
A simple social media approval workflow can make that difference. And when spreadsheets and chat messages start becoming too much to manage, a tool like QuickSocials can bring the approval process into one place.
Because your team shouldn’t have to keep asking, “Did the client approve this yet?”
The best approval workflow is the one that makes chasing approvals unnecessary.
Frequently Asked Questions
What is a social media approval process?
It is a defined process for reviewing, revising, and approving social media content before it is published. It establishes who reviews the content, where feedback is given, and who gives final approval.
How do I create a social media approval workflow?
Start by defining the stages, assigning one responsible person to each stage, setting review deadlines, choosing one place for feedback, and deciding what happens when a client doesn’t respond on time.
How many approval stages should a social media workflow have?
Most agencies can keep the process simple with internal review followed by client approval. Additional stages should only be added when the content or industry genuinely requires them.
How long should clients have to approve social media content?
A practical starting point is to give clients enough time to review the content before the scheduled publishing date, with the exact deadline depending on the client, campaign, and content type. The important thing is to agree on the turnaround time in advance.
How can I get clients to approve social media posts faster?
Make the review process simple, show the complete post, set clear deadlines, batch content for review, keep feedback in one place, and reduce unnecessary login or navigation steps.